How to Build a Camping Table with Storage Under $80
Learn how to build a camping table with storage for under $80 using a rigid crate, drawer slides, and bolted legs. It creates a stable prep surface with grab-and-go gear access for car camping.
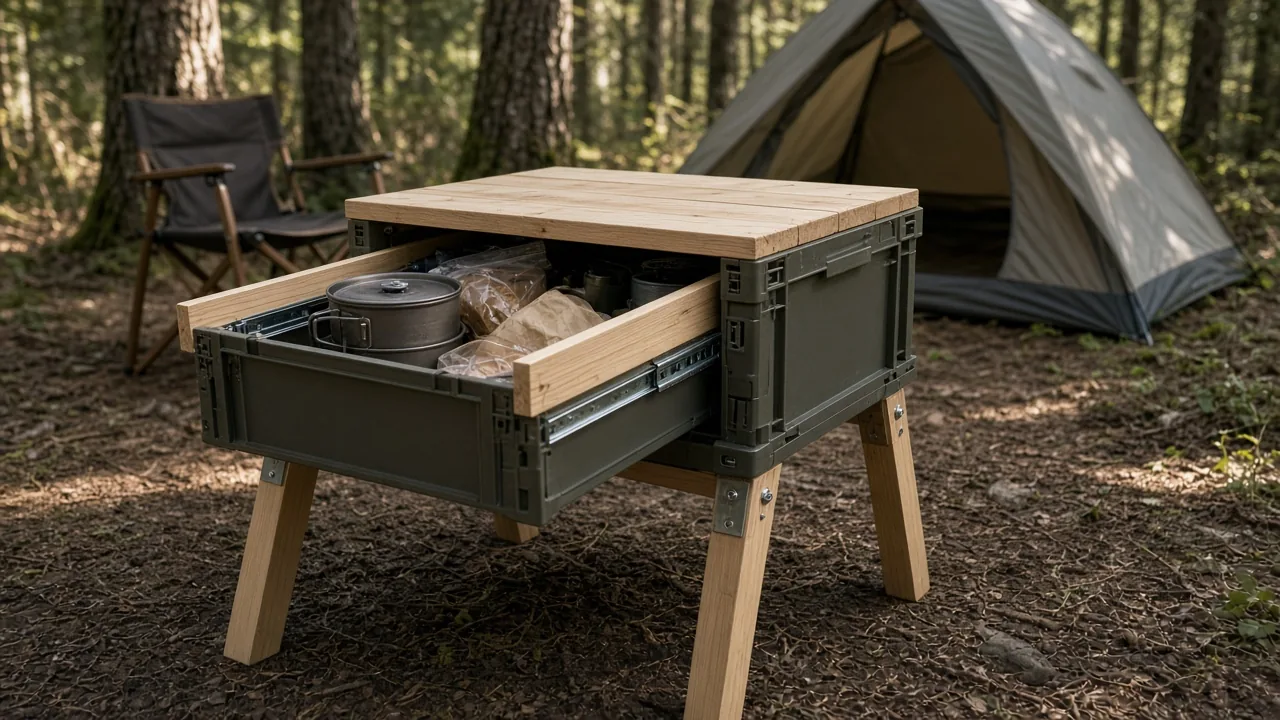
This DIY slide-lid camping table is worth building if you car camp and want a stable, packable surface with grab-and-go storage for under about $80 in materials. Learning how to build a camping table with storage starts with one rigid crate, a cut wood top, two drawer slides, and four bolted legs. The result holds cookware or dry goods, gives you a prep surface, and keeps the lid from sliding around in the truck or at camp. If you already have basic hand tools, this is more about measuring carefully than about advanced woodworking.
What You Need to Build a Camping Table with Storage
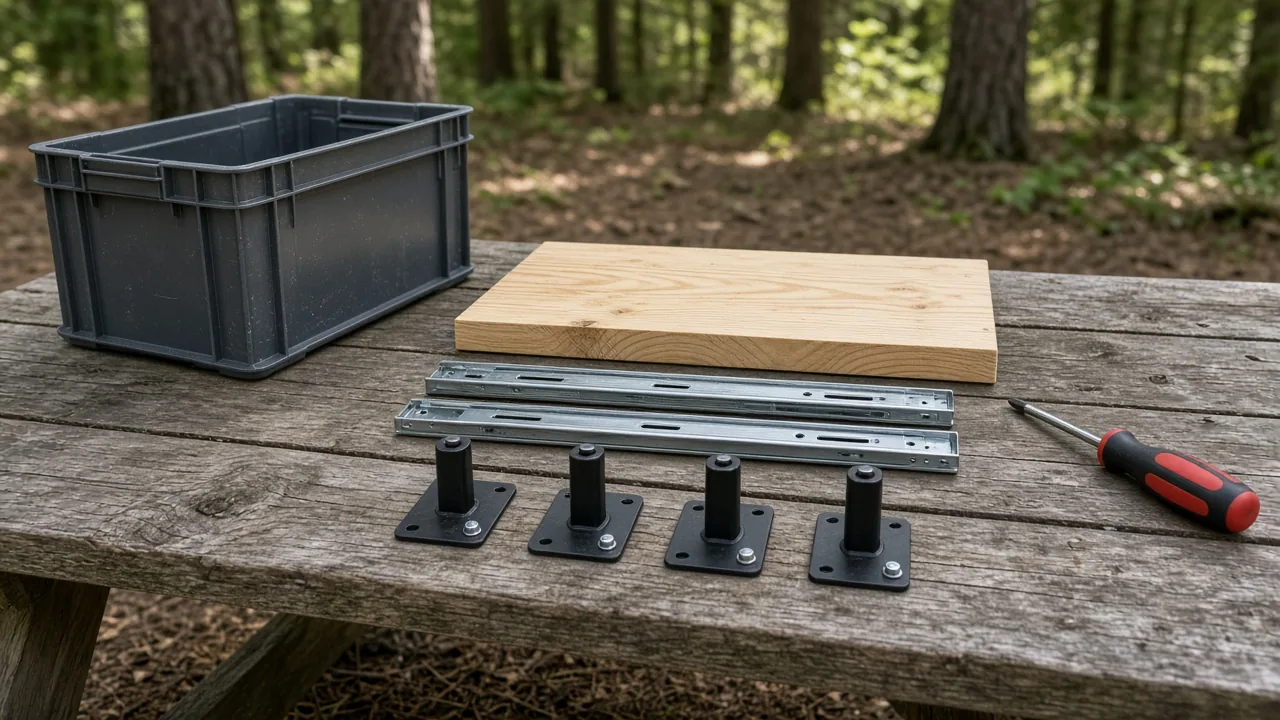
Start with a crate or bin roughly 15.7 by 23.6 inches and about 11 inches tall. Add a cut pine tabletop, two drawer slides, and four sturdy legs about 7.9 inches tall. That keeps the loaded height near 15.7 inches, low enough to work beside a camp chair and high enough to keep a stove or lantern off the ground.
The full material list should land under about $80 if you already own a saw, drill or punch, and basic screwdrivers. The main line items are the box, the wood top, two slides, four legs, nuts and bolts, and optionally a low-cost fishing light stand. You can skip the light stand and still have a useful table.
Choose a Storage Box That Works as a Table Base
Pick a rigid box with straight sides. Drawer slides mount flat against the side, so a floppy or heavily ribbed bin will flex and bind. A rectangular logistics crate or a stiff plastic bin works better than a thin-lidded household tote.
The box needs to be strong enough to hold cast-iron cookware, a camp stove, or a few dry-food bags without bowing. Straight vertical walls also let the lid travel cleanly. If the sides taper inward, the slide rails will not sit parallel, and the top may jam after a few uses.
Pick Legs That Won't Lean or Buckle
Avoid cheap U-style folding legs. They mount to a single point, wobble under side pressure, and tend to bend when the table is moved on dirt or asphalt. Instead, choose legs that can be bolted through the crate with nuts at an angle.
Four individual legs with flat mounting plates give you more points to lock down. Use four to six screws per leg, and put a nut on the back side of each bolt rather than relying on bare screws into plastic. A bolted connection resists racking much better than a screw biting into thin crate walls.
Add a Low-Cost Light Mount If You Want One
If you plan to use this box as a camp kitchen side table, a small light mount makes night tasks easier. A telescopic fishing light stand with a quarter-inch screw tip can hold many camping lights that have a threaded insert.
Mount it to the side or corner of the crate. The telescoping height helps you aim light across the stove instead of into your eyes. It is optional, so leave it off if you already hang a lantern from a ridge line or use a headlamp.
How to Build a Camping Table with Storage: Slide-Free Tabletop and Drawer
The drawer-slide method is what keeps the top from sliding around freely. Attach the two slide halves to the box and tabletop separately, measuring so the top stays aligned. When you mate them, you get about 7.9 inches of slide travel for reaching gear inside without removing the lid.
Work on a flat floor or bench. A crooked rail will make the top bind or sit proud on one corner.
Mount Drawer Slides on the Box First
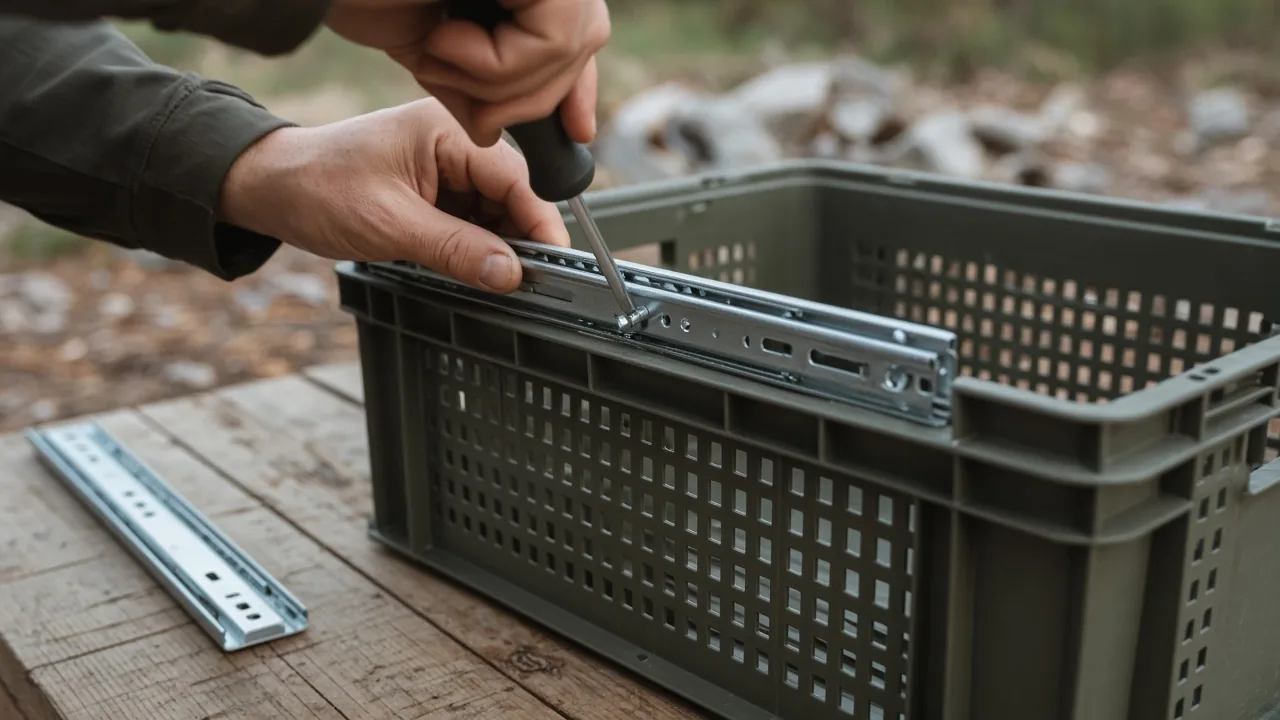
Screw the lower slide channels to the side of the box. Check that both rails are level before adding the top. Use small screws with washers if the crate plastic is soft, and add a backing plate or nut where possible.
The lower channel should sit close to the top edge of the crate so the tabletop rests near flush. If the channel is too low, the wood top will overhang unevenly. If it is too high, the top may not slide without scraping the box rim.
Attach the Tabletop So It Stays Put
Measure the top’s rail position from both edges to keep the lid straight. Install the upper slide halves onto the underside of the board, then mate the board to the lower rails like a drawer. A spring catch on the open side can stop movement in transit.
Before screwing the upper rails down, fit them dry and test the slide. The top should travel 7 to 8 inches without lifting. If one corner binds, loosen and adjust the rail by a sixteenth of an inch at a time. A small misalignment at the rail becomes very obvious once the top is weighted.
Make It More Stable in Camp and in the Car
A box that works indoors may still slide or rack in a moving vehicle. Bolt each leg through the crate with four to six screws, angle opposing pairs differently, and use nuts rather than bare screws. That makes the table resist side-to-side movement on dirt, gravel, and trunk floors.
Set Leg Angles for Less Rocking
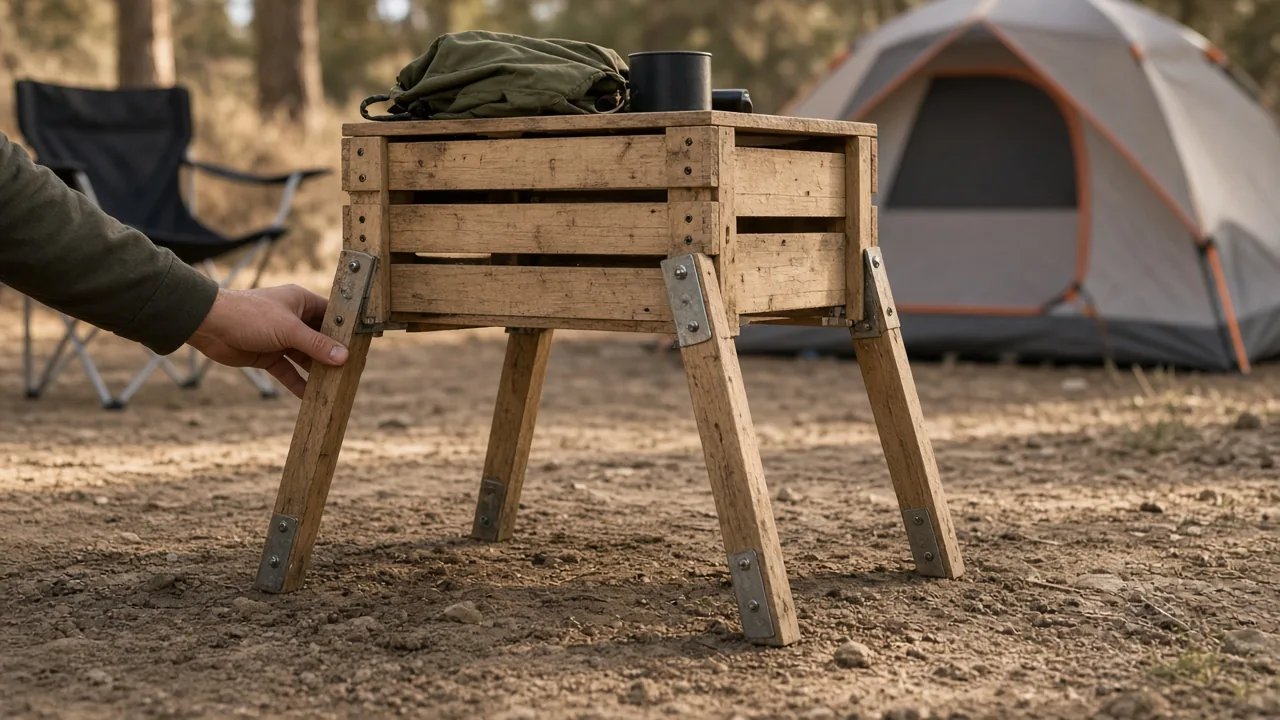
Do not keep all four legs parallel. Alternating or slightly splayed angles reduce wobble on uneven tent pads and packed dirt. One good setup is a pair of legs angled slightly outward and another pair angled in a different direction, which gives the crate a wider footprint at the base.
The upper mount points stay in place, but the lower foot positions spread out. That helps when one foot sits in a root notch or on soft ground. It also reduces the chance that the whole table tips if you lean a hand on one edge.
Keep the Lid From Sliding While You Drive
If you store the table in a vehicle, a simple latch or cam strap over the lid helps prevent the top from sliding on rough roads. The drawer slides are smooth, so a hard stop or sharp turn can let the board move even when it feels secure at camp.
Run a strap across the tabletop and around the crate before loading it in the trunk. If the box sits behind a rear seat, place it against a flat surface and pack soft items around the base. For food storage, remember that a plastic bin is convenient but not bear-resistant. Check local rules before leaving food in a car overnight.
Who Should Build This DIY Camping Table
This project fits car campers who want one box that works as kitchen gear storage, a prep surface, and a side table without adding a separate camp table. It is too heavy and bulky for most backpacking trips, but it earns its space in a trunk or cargo area.
Best for Car Campers Who Want One Less Thing to Pack
Because the box stores cookware or dry goods and becomes the table, it follows the same pack-as-a-unit habit that makes trunk loading faster. Fewer loose items means fewer trips between the car and camp, especially when you set up after dark.
The table also helps at home. Use it as a staging crate in a garage or entryway, then slide the lid open to check gear without unpacking everything. That cuts down the last-minute search for a stove or a can opener.
Skip It If You're Counting Ounces for Backpacking
A wood-topped crate with drawer slides is too heavy and bulky for backcountry use. This is a basecamp or boot-of-the-car project. Even a lightweight version would take up too much pack volume and add several pounds you could spend on food, water, or a warmer sleep system.
If you backpack, a small folding foam sit pad or a single aluminum table top makes more sense. Save this build for car camping where the truck carries the weight and the crate earns its space as storage.
Alternatives If You'd Rather Buy Than Build
If cutting and drilling wood is not practical, a ready-made bin with a wood lid plus add-on legs is a faster route. The hardware may be weaker than a bolted DIY top, so check leg mounting and lid movement before relying on it for a stove or lantern.
A Ready-Made Bin With a Wood Lid
Some storage boxes already have a lid stiff enough to serve as a table. That cuts out the drawer-slide work, but the lid may lift off completely or slide sideways under weight. Add a latch or strap, and test whether the plastic sides can hold legs without cracking.
This route suits someone who needs a gear bin more than a precise table. It works for dry storage and light food prep, but it is not as stable as a top that rides on rails and locks down.
Storage Shelving That Pulls Double Duty at Home
If you are short on space, adjustable shelving or portable rack boxes can organize gear at home and still fit in a car with careful sizing. The same bin you use for kitchen gear in camp can live on a garage shelf or in an entry closet during the week.
Look for a bin at least 14 to 16 inches deep so it clears a stove, pot set, or small lantern. Wheels can help at home, but measure the trunk opening first. A tall wheeled bin may not clear a sloped rear hatch, especially in a small crossover.
| Approach | Stability | Weight and Bulk | Best Fit | Weak Point |
|---|---|---|---|---|
| DIY slide-lid crate | High if legs are bolted and angled | Heavy and bulky for backpacking | Car camping kitchen box | Requires measuring and drilling |
| Ready-made bin with wood lid | Moderate; can flex or slide | Similar to DIY | Fast storage-to-table solution | Leg mounts and lid movement need testing |
| Home shelving or portable rack boxes | Good at home, fair in camp | Depends on sizing | Gear storage first, camp table second | May be too tall or flexible for stove use |
Bottom Line
Build this table if you car camp, want one less thing to pack, and need a stable prep surface with quick access to stored gear. Use a rigid crate, bolted legs, and properly aligned drawer slides. Add a spring catch or strap so the top stays put on rutted roads and uneven dirt.
Decide based on car versus backpack use, expected nighttime temperatures, and rain odds before packing or leaving this table behind. Pair it with appropriately rated sleep gear and a camp kitchen setup. As with any camp kitchen, never use a stove or heater inside your tent.
— Camp Kit Journal
This article is general information about camping gear, not professional safety, medical, or wilderness training. Check fire restrictions, weather, and campsite rules before you go, and follow the manufacturer's instructions for your own equipment.
FAQ
What materials do I need to build a camping table with storage?
You need a rigid crate roughly 15.7 by 23.6 inches, a cut pine tabletop, two drawer slides, four sturdy legs about 7.9 inches tall, and nuts and bolts.
Can this DIY camping table be used for backpacking?
No, it is too heavy and bulky for backpacking. This project is best for car camping where the vehicle carries the weight.
How do you keep the tabletop from sliding during transit?
Add a spring catch or cam strap over the lid. Run a strap across the tabletop and around the crate before loading it in the vehicle.
What type of box works best for a slide-lid camping table?
Choose a rigid box with straight vertical sides, such as a logistics crate or stiff plastic bin, so drawer slides mount flat and the lid travels cleanly.
What leg angles help reduce rocking on uneven ground?
Don't keep all four legs parallel. Splay one pair slightly outward and angle the other pair differently to widen the footprint on uneven surfaces.



