Car Camping Kitchen Box Organization: Keep Only What You Use
A well-organized car camping kitchen box saves setup time and protects cookware. Learn how to choose a protective case, divide it by task, and keep only what you actually use.
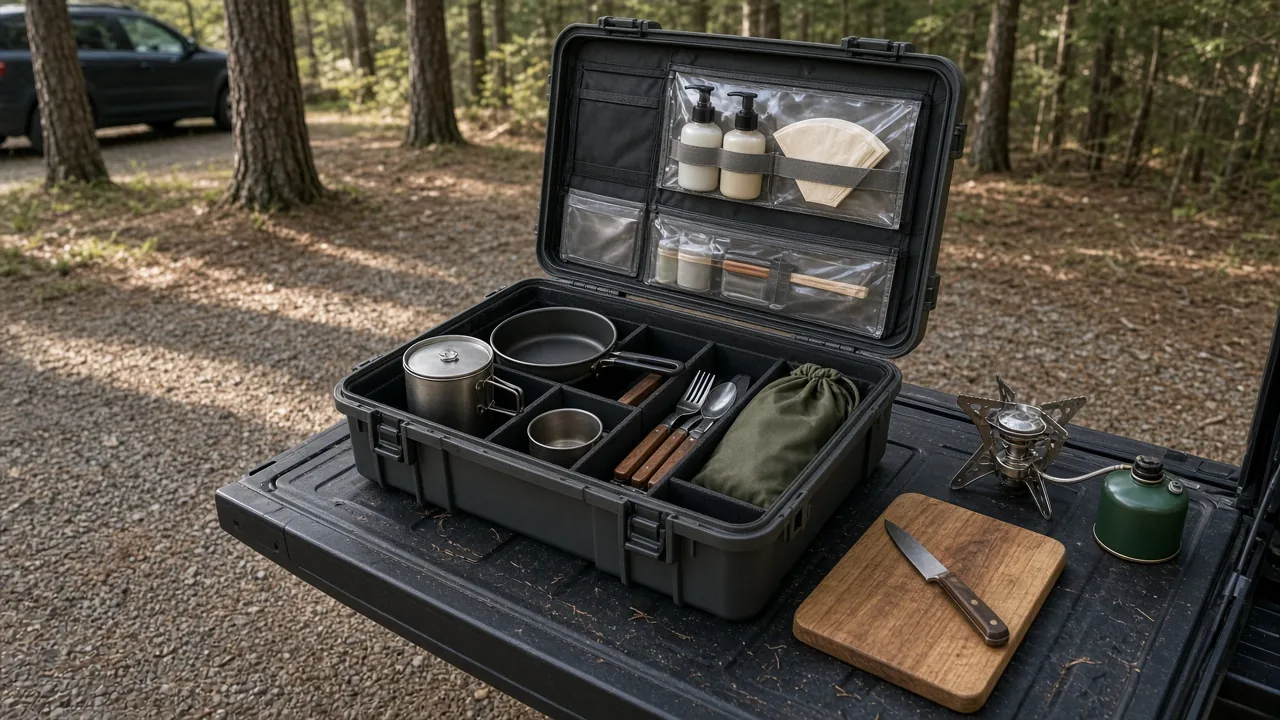
Good car camping kitchen box organization saves setup time, protects cookware, and stops you from hauling gear that never leaves the bin. Start by filtering gear to what you actually use, then choose a protective box and divide it by task. This guide covers selection, layout, and the safety checks that keep a car camping kitchen efficient.
Start with a protective case that can double as a work surface
Pick a hard case that protects gear from dust, bumps, and splashes, and can support a cutting board or tabletop when the lid is closed. A rigid box with a flat top gives you a place to set a stove, chop vegetables, or rest a pan without bending over a low campsite table.
Why a hard case beats a soft bag for car camping kitchens
A rigid case holds dividers and lid organizers better than a soft bag. The structure gives you fixed zones, so a pot goes back in the same place every time. Soft bags collapse, shift, and force you to dig through loose utensils, which slows setup and makes it harder to see what is actually in the box.
Hard cases also protect gear when roads get rough. Dust, rain, and the occasional dropped strap are less likely to reach a cutting board or coffee grinder inside a sealed shell. If you camp on gravel roads or in wet shoulder seasons, that protection matters.
Fit the lid clearance before you pack
Check the lid's inside depth before filling the box. Many hard cases have raised lid ribs or recessed panels that reduce usable interior height. If you pack items flush with the rim, the lid may not close.
One reader who built a kitchen box from a waterproof case notes that the lid has an inner recess, so the interior load has to sit slightly lower than the rim. Always test-pack at home, close the lid, and shake the box once before you trust the layout for a trip.
Watch outs
Hard cases are too heavy for backpacking, so reserve this system for car camping where kitchen weight matters less. A loaded case can weigh 30 to 40 pounds or more, which is fine in a car trunk or truck bed but unmanageable on foot. Choose a lighter approach if you plan to carry the kitchen away from the vehicle.
Use a divider system instead of loose gear
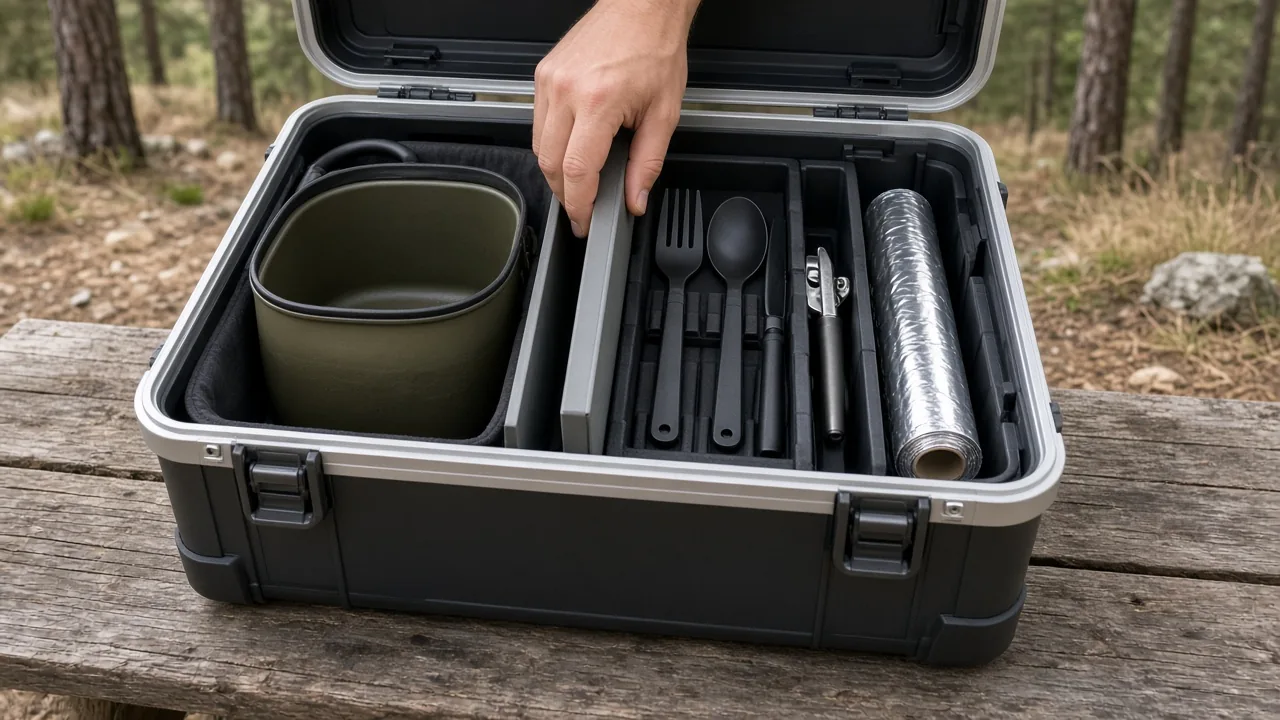
Create fixed zones with dividers or packing cubes so each utensil and ingredient has a spot. Loose gear turns into a game of shuffle-and-dig when you need a can opener at 7 a.m. A divider system keeps hot pots, sharp tools, and small items from colliding during transport.
How to add dividers without spending much
A camera divider set works well because it is designed to hold dense gear in place, but you do not need a specialty insert. A used tabletop board cut to fit the rim can create stable compartments. One approach is to cut a thin board to sit across the box opening, then notch it so it locks onto the box edge. That gives you a firm divider without gluing or drilling.
If you want a full grid, a camera insert or rigid foam divider set can be cut to size. Position the dividers tightly enough that items do not slide, but leave enough flex to remove a cook pot without forcing it.
Flat items fill gaps first
Store foil, wax paper, can openers, and zipper bags in narrow gaps. These flat items fit into dead space between larger cookware and help stabilize the load. The catch is that they need to earn their place: if you do not use foil on most trips, leave it behind. Car camping space is generous, but it is not unlimited.
Watch outs
Soft storage bags may need to be turned upside down to fit inside a box. A kitchen set in a travel pouch might only work if you flip it so the zipper faces down. Test-pack before a trip rather than assuming the layout works. A bag that fits in one direction at home may not close when the box is on a truck tailgate.
How to pare down to the car camping kitchen gear you actually use
Note what you never unpack on two or three trips, then remove it. Many campers find that a smaller, focused kit works better than the biggest possible box. The goal is not to fill every cubic inch but to keep the items that earn space on most trips.
Test before you lock the list
Start with a workable kit, record what you actually touch on each trip, and cut the rest before adding storage extras. If a tool sits unused for three outings, it is carrying itself. Make a simple list: a pot, a pan, a stove, a mug, a spoon, a small wash kit, and enough food preparation tools for your usual meals. Everything beyond that should have a clear purpose.
One tool, two jobs
Choose a pot that also works as a cup, a sandwich iron that folds flat, or a spatula-fork set to reduce pieces without losing function. A folding multi-tool with a spatula and fork takes less space than separate utensils. A container that holds water, heats liquid, and works as a drinking vessel covers three jobs in one piece. These choices matter most when the box is small or the trip is long.
Watch outs
Some redundancy is fine for car camping. A spare spatula or an extra kitchen towel is cheap insurance. But gear that no longer fits the lid, gets used once a year, or makes the box impossible to close should leave. The box should close easily every time, including when you repack in cold or wet conditions.
Organize the lid as your cleaning and coffee station
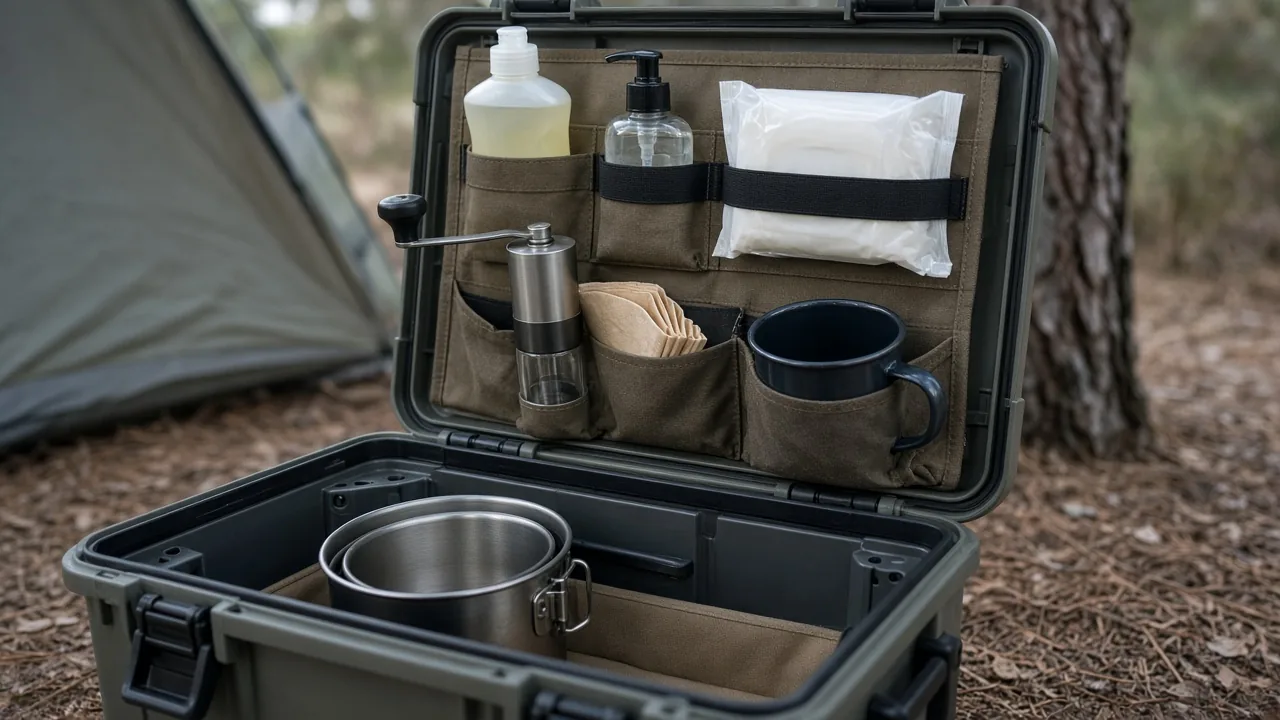
Use the lid interior for soap, wipes, spices, and coffee gear, so the main box stays free for hot pots, stoves, and food. A lid organizer with pockets keeps these small items off the cooking surfaces and makes them simple to find.
Keep soap separate from cooking tools
Put dish soap, hand soap, and sanitizing wipes in their own lid pockets. This avoids cross-contamination and keeps messes off cooking surfaces. When soap leaks, it stays inside the lid pocket rather than pooling under a pot. Use resealable bottles and check the lids after rough roads, because a poorly sealed soap dispenser can spread film across nearby gear.
Store camp coffee in its own slim zone
A hand grinder, single-serve filters, and a mug group together so you can make coffee without unpacking the stove area. Keeping coffee gear in one slim pocket means you can pull out the whole set, brew, and return it without moving pots or fuel. If you prefer pour-over or a French press, dedicate a small area for that instead. The point is that coffee lives in a predictable place.
Watch outs
Liquids and coffee grounds can leak or spill. Use resealable containers for ground coffee, and check every liquid lid after driving on rougher roads. A lid organizer works only if its contents stay sealed. A small spill in a sealed box can get into food or tools before you notice it.
Match the stove and fuel to how you cook
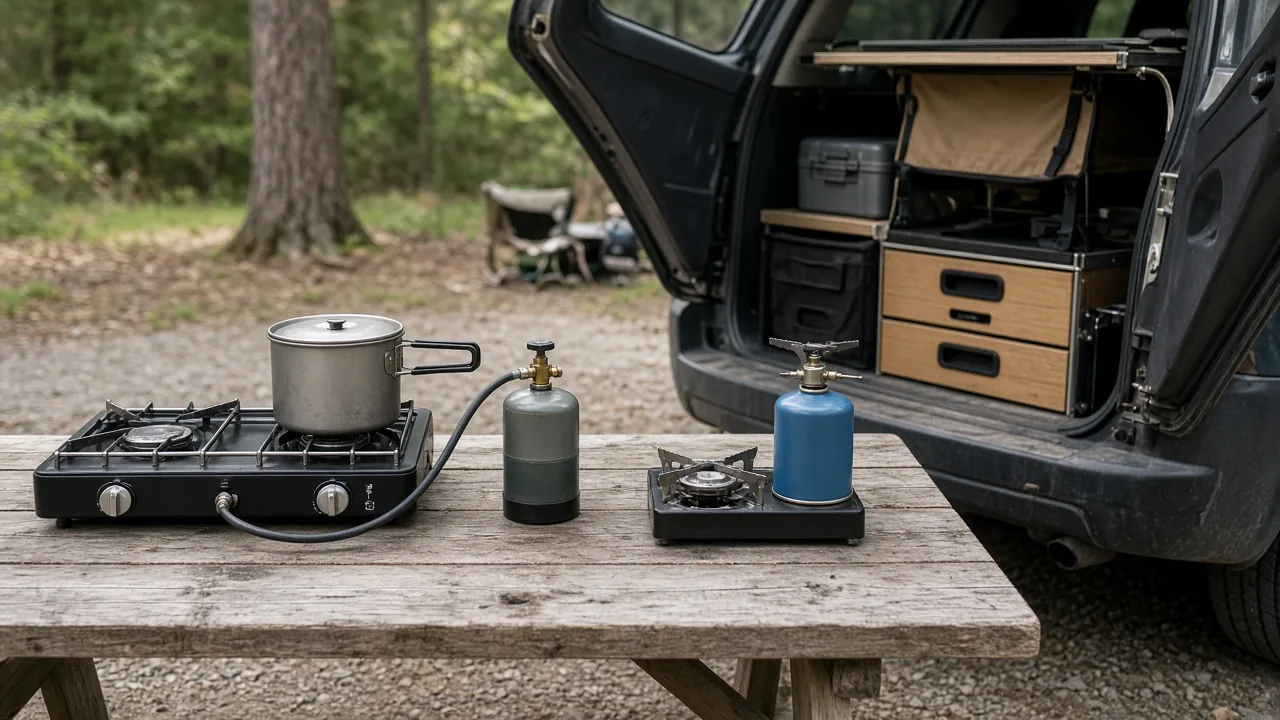
Decide between a propane double burner, a butane canister stove, or a simple single burner based on group size, cook complexity, and whether you carry an electric battery. The stove is usually the heaviest and most heat-sensitive item in the box, so it should drive the layout.
Propane vs butane for a car camping kitchen box
A refillable one-pound propane tank with a hose works well for multi-day groups. It is stable, widely available, and can run a two-burner stove for several meals. A small butane canister is lighter and simpler for solo or short trips, but it can struggle in cold weather and does not power large burners as consistently.
| Fuel option | Best for | Pros | Cons |
|---|---|---|---|
| Refillable 1 lb propane tank | Groups, multi-day trips, double burners | Stable output, refillable, good in cold weather | Heavier, needs hose connection |
| Small butane canister | Solo trips, simple meals, short stays | Lightweight, compact, easy to install | Colder-weather limits, lower output |
| Refillable 1 lb propane with adapter | Group trips that stay near the vehicle | Same propane benefits plus long runtime | Still heavy, setup takes a few minutes |
| Single burner with butane canister | Small box, fast coffee, one-pot meals | Very small footprint, fast boil | Not enough for multiple dishes at once |
Stow the burner inside its own pot
A stove system that nests inside a five-liter pot saves space and gives you a built-in pan. The pot protects the burner from bumps, and the whole unit takes one compartment instead of two. Verify the lid still closes before you commit to this layout. Some nested systems leave just enough clearance; others push the box height past the lid rib line.
Watch outs
Check fire restrictions and campsite rules before cooking. Some areas ban open flames or require gas stoves only during high-fire-danger periods. Never use a stove or heater inside your tent. Carbon monoxide builds quickly in enclosed spaces, and stove flames can ignite sleeping bags or tent walls. Operate fuel appliances outdoors with proper clearance from flammable gear.
Pack meal tools that earn space for car camping, not backpacking
Include heavier items like a griddle, sandwich press, or steamer only if you use them on most trips. Car camping favors convenience, but every extra cooking tool adds bulk and setup time. Be honest about which meals you actually make.
Car camping vs backpacking kitchen weight
For car camping, extra pounds are less important than setup speed and comfort. A cast-iron press or a weekend waffle maker can be worth it if it means a hot breakfast that gets everyone out of the tent. For backpacking, cut every ounce and choose a single pot or mug. The car camping box can tolerate weight, but it should not become a catch-all for tools that belong in a home kitchen.
Use the box as a table only if stable
A hard kitchen box can work as a breakfast table if it has a flat lid and sits on level ground. One reader sets the box in shallow water as a small table, another uses it as a morning coffee spot. Before placing hot cookware on it, check the height, level ground, straps, and heat clearance. A lid that flexes under weight or sits uneven can tip a pan. Tighten any tie-downs before cooking, and keep the stove at least a few inches from the box edge.
Watch outs
Store food in bear-safe containers where required. Never leave a box unattended with fuel or dirty dishes in bear country. Even outside bear habitat, dirty cookware attracts rodents and insects. Pack out food scraps and follow Leave No Trace practices: wash dishes away from water sources, use established fire rings when fires are allowed, and camp on durable surfaces.
How to choose a car camping kitchen box organization system
Compare a hard case, a clear plastic bin, and a repurposed tool box by protection, visibility, weight, and divider options before committing to one layout. Each approach works, but they favor different camping styles.
Hard case vs clear plastic bin
A hard case protects and divides well but is heavy and dark inside. You cannot see the contents from outside, which means opening the box to check inventory. A clear bin is lighter and easy to scan, but less stable and harder to mount. A clear bin also lacks the internal divider support that a rigid case provides, so gear shifts more during transport.
| Box type | Protection | Weight | Visibility | Divider options |
|---|---|---|---|---|
| Hard case | High; dust, splash, and impact resistant | Heavy | Low; opaque walls | Excellent; rigid panels or camera inserts |
| Clear plastic bin | Low to moderate | Light | High; see contents without opening | Limited; bins can shift, hard to mount |
| Repurposed tool box | Moderate | Moderate | Low to moderate | Variable; some tool trays work, others do not |
Cheap box alternatives
A used hard case can work as a base, but you may need to cut your own lid organizer or lamp slot. Some campers find discounted cases at thrift stores or surplus shops and adapt them with basic tools. The tradeoff is time: a cheaper case may require cutting, sanding, and test-fitting before it holds a full kitchen. Budget options may also have shallower lids or weaker hinges, so inspect the latch and seal before buying.
Avoid packing to the brim
Leave a little air space for lid ribs, grabbing handles, and re-packing in cold or wet conditions, so the box stays easy to open. A box packed tight at home may be impossible to close in the field after a rain-soaked towel swells or a fuel canister shifts. Keep the load slightly below the rim, and make sure the handle and latch move freely without pinching gear.
Final check before you pack
Before a trip, check the low overnight temperature, rain chance, and whether you are car camping or backpacking, then only load cookware that matches that trip. A dual-burner or single stove and a small table surface are usually enough. If you need to replace a piece of the kit, think through how it fits the box, the stove system, and the meals you actually cook. The box should open easily, close cleanly, and ride quietly to the next campsite.
This article is general information about camping gear, not professional safety, medical, or wilderness training. Check fire restrictions, weather, and campsite rules before you go, and follow the manufacturer's instructions for your own equipment.
FAQ
What is the best type of box for a car camping kitchen?
A hard case with a flat lid works well because it protects gear from dust, bumps, and splashes, and can double as a work surface. Avoid soft bags since they collapse and make gear harder to organize.
How do I keep my camp kitchen box organized?
Use a divider system or packing cubes to create fixed zones for utensils and ingredients. Flat items like foil and can openers can fill narrow gaps to stabilize the load.
How do I decide what to keep in my car camping kitchen box?
Track what you actually use on two or three trips, then remove items that stay packed. Keep one tool that can do two jobs, like a pot that works as a cup, and leave behind gear that never leaves the bin.
Can I use a kitchen box as a table?
Yes, if the box has a flat, stable lid and level ground. Check the height, straps, and heat clearance before placing hot cookware on it, and keep the stove away from the edge.
Should I choose propane or butane for a car camping stove?
A refillable 1 lb propane tank is stable and good for groups or cold weather, while a small butane canister is lighter and simpler for solo or short trips. Match the fuel to your group size and cooking style.



